This is a new topic in 12.03.
This is a new topic in 12.04.
Content highlighted in yellow is new in 12.03.
Content highlighted in blue is new in 12.04.
Absence
You can begin and end absences from the Absence screen.
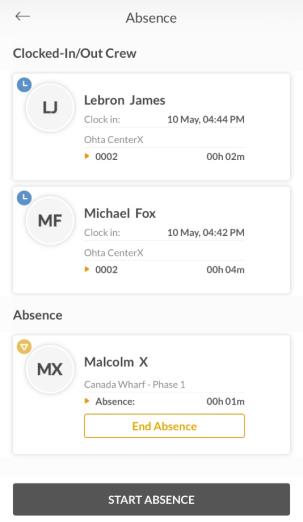
To begin managing absences, tap the ABSENCE button. This opens the Absence screen. Here you will see your crew listed in up to two categories: Clocked-In/Out Crew and Absence.
Starting an Absence for an Employee
-
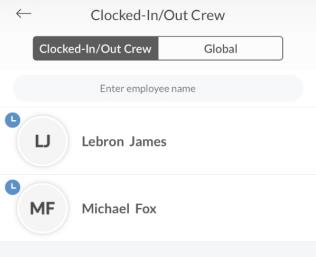
Tap the START ABSENCE button. This opens the Clocked-In/Out Crew screen.
-
If the employee is part of your crew, you will be able to find them under the Clocked-In/Out Crew tab. If not, you will have to find them under the Global tab. Once you have found the employee, tap their name to select them. If absence subtypes have been configured, the Subtypes screen will open. If not, proceed to step 4.
-
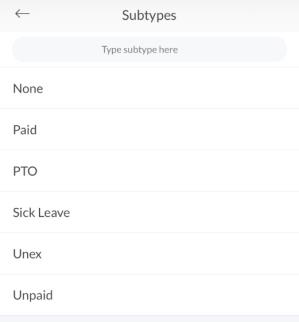
Tap to select an absence subtype from the list. If none of them apply, select “None” from the top of the list. You will be prompted to enter a reason for the absence.
-
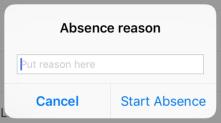
Enter the reason for the absence in the text box. This reason will be visible to project managers on the web application. This step is not mandatory and can be left blank if you wish.
-
Tap the Start Absence button on the Absence Reason popup to start the absence.
Ending an Absence for an Employee
Ending an employee’s absence from the Absence screen will update their status to Clocked Out. Thus, this should only be done at the end of their scheduled shift. If you wish to end an employee’s absence because they have arrived to work, you should clock them in – see Clocking In for more details.
-
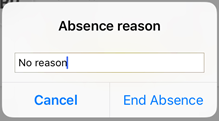
To end an absence, find the employee under the Absence list and tap the End Absence button on their card. You will be prompted to enter a reason for the absence.
-
If a reason was entered when the absence was started, that reason will appear in the text box. The reason will be visible to project managers on the web application. You can edit the reason if you wish or leave it unchanged (even if it is the default “No reason”).
-
Tap the End Absence button on the Absence Reason popup to clock out the employee.