This is a new topic in 12.03.
This is a new topic in 12.04.
Content highlighted in yellow is new in 12.03.
Content highlighted in blue is new in 12.04.
-
Click Review Expense Reports. This shows a list of all expense reports that have been submitted to you by employees or delegated to you by another approving manager.
To review a report, right-click the report on the list, or left-click the report and click the menu icon
 , and click Review Expense Report. This opens the Report Details screen.
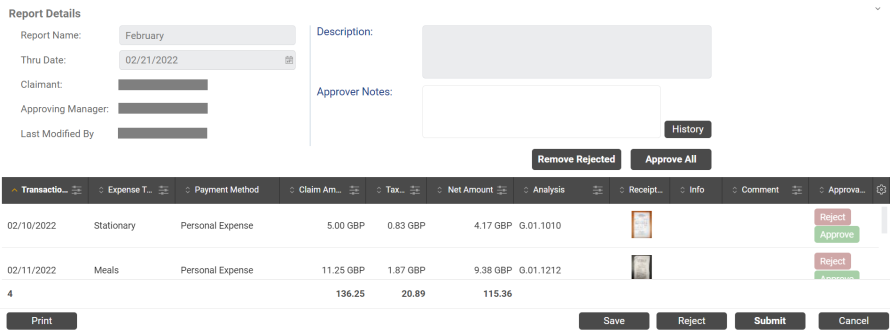
This screen shows a breakdown of each expense claim item in the expense report. If you wish, click the collapse button
 in the top-right of the screen to collapse the header, allowing you to see more items at once. If there is an
  icon in the Info column, this indicates that the item on this row contains policy information warnings. If there is an
  icon in the Info column, this indicates that the item on this row contains additional comments to justify policy breaches. If there is a white flag
  or a black flag
  in the Info column, this indicates that the item may be suspicious (see Suspicious Items).

If there is an icon in the Info column, this indicates that the report on this row contains expense claim items with policy breaches.
If you are a super approver, you can select from three options above the grid: All, Assigned to me and Stuck.
-
Select All to see all expense reports in the "awaiting approval" stage, regardless of which approver they are assigned to.
-
Select Assigned to me to only see expense reports which have been assigned to you via the approval group workflow (the default view available to all approvers).
-
Select Stuck to only see expense reports which have become stuck due to invalid or missing ERP+ user data.
-
To view the full details of an expense claim item listed in the report, right-click the item on the list, or left-click the item and click the menu icon
, and click View. This opens a read-only version of the Manage Expense Claim Item window for that item.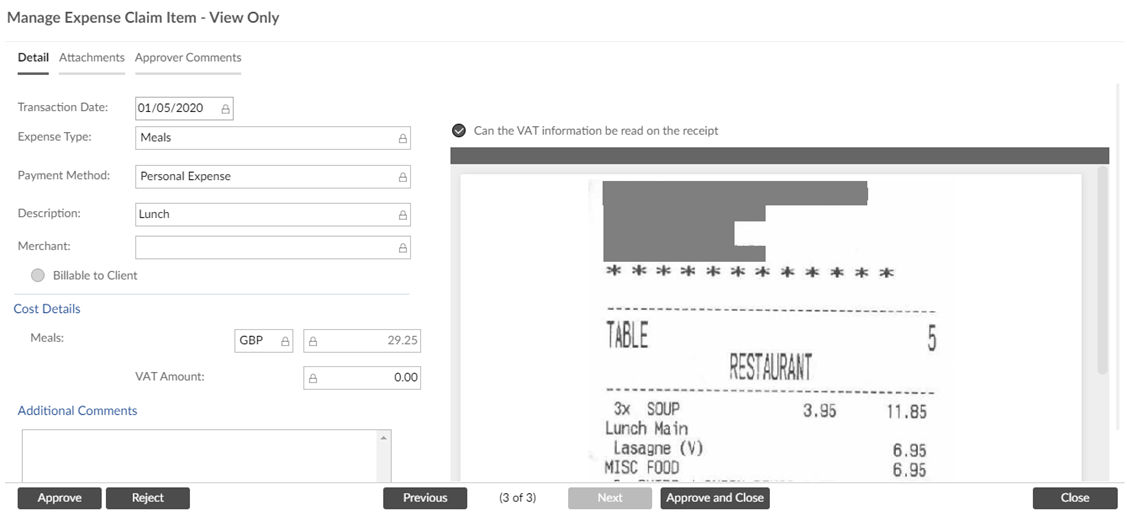
-
There are several buttons at the bottom of the window with which you can interact with the claim item. Click the
 or
or  buttons to approve or reject the item, respectively. Click the
  and
and  buttons to move between claim items within the report you are reviewing. Click the
  button to approve the item and immediately move to the next, or if you are on the last item in the report, click the
  button to approve the item and return to the Report Details screen.If an expense item is awaiting project manager approval, you cannot approve or reject it as a standard approving manager. You will therefore not be able to approve or submit the expense report until the project manager has approved the attached item(s). This restriction does not apply if you are setup as a Super Approver.
 -
To modify an expense item, right-click the item on the list, or left-click the item and click the menu icon
, then click Modify. This opens the Manage Expense Claim Item window for that item. Depending on the Expense Parameters setup by your administrator, you may be able to change the Expense Type, Billable to Client and/or the Analysis Details of an expense item. -
To approve or reject an individual expense claim item from the Report Details screen, click
 or
or  in the Approval Status column next to the item in question. The button you click will light up to indicate that the item has been approved or rejected. If you wish to approve all or most of the items in the report, click the
  button to automatically light up the button next to every item in the report. You can then still click the button next to individual items. Note: your company may have a policy to not allow the button.
-
To leave a comment against an expense claim item, click the box in the Comment column for the item in question (you will see a pencil icon when you hover over this box) and enter your comment, then click away to save it. This comment will be visible to the claimant in the Approving Manager Comments box when they open the claim item.

-
To save the changes you have made while reviewing the expense report, click
 .
. -
If you wish, you can remove rejected items from the report before submitting it. To remove an individual item: right-click the item, or left-click the item and click the menu icon
, then click Reject And Remove. You will receive a popup asking if you are sure.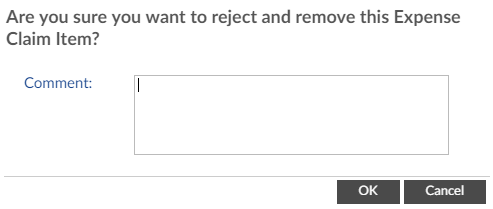
Optionally enter a comment, then click
 to reject and remove the item.
Alternatively, you can remove multiple items at once by clicking the
button next to each item, then clicking the  button. You will receive a popup asking if you are sure.
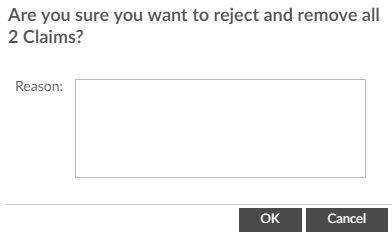
Optionally enter a reason, then click
to reject and remove the items. -
Once you have approved or rejected every expense item in the report, click
 to submit the report. You will receive a warning message asking if you are sure. Click
  to finalise your decision.
If you approved every item in the report, the entire report will then move to the next stage of approval. If you rejected every item in the report, the entire report will be sent back to the claimant. If you approved some items and rejected others, what happens next depends on your company’s policies. Either the approved items will be moved to the next stage of approval while the rejected items will be sent back to the claimant, or the entire report will be sent back to the claimant.