This is a new topic in 12.03.
This is a new topic in 12.04.
Content highlighted in yellow is new in 12.03.
Content highlighted in blue is new in 12.04.
Miscellaneous
The availability of the Miscellaneous section is dependent on the “Linked to Mobile” setting for the Miscellaneous time type (configured on the web module). There are three possible settings:
-
Not Available: The Miscellaneous button and screen are not visible on mobile.
-
Review Only: The Miscellaneous button and screen are visible on mobile, but mobile users cannot update any records.
-
Available for Miscellaneous input: The Miscellaneous button and screen are visible on mobile and mobile users can create Miscellaneous records.
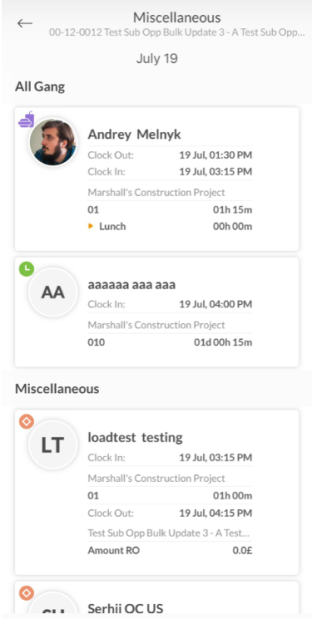
If the Miscellaneous button is available, tap it to open the Miscellaneous screen. You will see your crew split into two groups: All Crew and Miscellaneous. The All Crew group contains all employees within your crew who do not have any Miscellaneous transactions recorded on the selected date. The Miscellaneous group contains employees within your crew with at least one Miscellaneous transaction recorded on the selected date, ordered by recency of their last Miscellaneous transaction.
Adding a Miscellaneous Record
If the "Available for Miscellaneous input" setting is active, the Global and ADD RECORD buttons will be visible at the bottom of the screen.

-
To begin adding a Miscellaneous record, you must first select the employee(s). This can be done from the Miscellaneous screen or using the global search.
-
To select employees from your crew, tap the circle on the right of their card on the Miscellaneous screen. You can select as many employees as you wish using this method.
-
To select an employee from outside your crew, tap the Global button. This opens the global search. Enter the employee's name in the search bar under the Global tab to see a list of results, then select the employee from the list. Only one employee can be selected at a time using this method.
-
-
If you selected employees from the Miscellaneous screen, tap the ADD RECORD button to open the Add Miscellaneous Record screen. If you selected an employee from the global search, the Add Miscellaneous Record screen will open automatically.
-
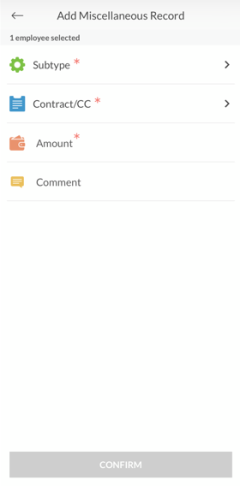
Tap Subtype to view the list of available subtypes. Select a subtype, then tap CONFIRM. Every Miscellaneous transaction must have a subtype.
-
Tap Contract/CC to open the cost codes list. You can find recently used cost codes under the Recent Cost Codes tab, or view all available cost codes for the current contract under the All Cost Codes tab. To change to a different contract, tap Change, select the new contract, then tap CONFIRM. Once you have selected the desired cost code, tap CONFIRM. This step is mandatory.
-
If you selected an amount-based subtype, enter the monetary amount of the transaction is the Amount field. If you selected an hours-based or memo hours-based subtype, enter the number of hours in the Hours/Memo Hours field. This step is mandatory.
-
Optionally enter a comment for the transaction in the Comment field. This comment will be visible to approvers on the web application.
-
Tap CONFIRM to create the Miscellaneous transaction.