This is a new topic in 12.03.
This is a new topic in 12.04.
Content highlighted in yellow is new in 12.03.
Content highlighted in blue is new in 12.04.
Type
Creating a Type
-
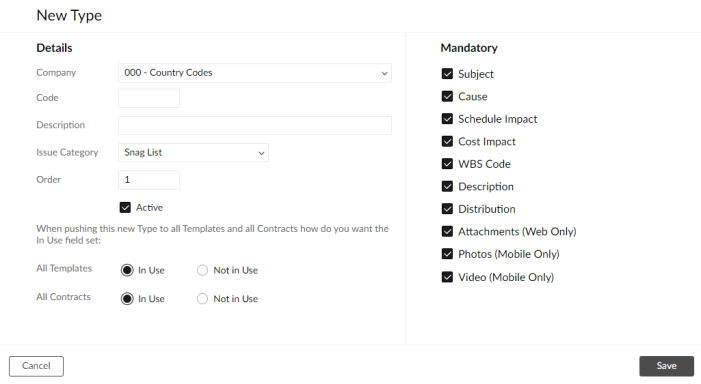
Open the Type tab and click the + Add Type button. This opens the New Type window.
-
Complete the fields as follows:
|
Company |
Select the company which will use this type in issue creation. If Type is set to Global in configuration, this field will be hidden. |
|
Code |
Enter a code for the type. This is for internal use only. |
|
Description |
Enter a description of the type. This is the text that will appear in the lookup list. |
|
Issue Category |
Select which issue category this type falls under. This is a pre-set list consisting of Snag List, Non-Conformities, Dayworks and Construction. |
|
Order |
Enter a number to dictate where this type will appear in the lookup list. Order number 1 means it will be at the top of the list, order number 2 means it will be the second option down and so on. |
|
Active |
Tick this box to make this an active type. If you do not tick this box, users will not be able to select this type when managing issues. |
|
All Templates |
Select whether you want this type to initially be marked as In Use or Not in Use when it is pushed to the relevant contract templates. If it is marked as Not in Use by a contract template, and the contract template override is activated for type, users will not be able to select this type when managing issues linked to contracts using that template. Note that if the type is not active, it is locked to Not in Use. |
|
All Contracts |
Select whether you want this type to initially be marked as In Use or Not in Use when it is pushed to the relevant contracts. If it is marked as Not in Use for a contract, and the contract level override is activated for type, users will not be able to select this type when managing issues linked to that contract. Note that if the type is not active, it is locked to Not in Use. |
|
Mandatory |
The Mandatory section of the window contains a list of fields which are available when creating or editing an issue. Tick the box next to a field label to make it a mandatory field for issues of this type. Mandatory fields must be completed when creating or editing an issue, otherwise the user will be unable to save. |
-
Click
 to save the type.
Editing a Type
Inline editing is enabled within the grid for every field except Company. To edit mandatory field status for a type, click the Details link in the Details column to open the Mandatory window.
Deleting a Type
-
To delete a type, click the trash can icon
 in the Actions column. You will receive a confirmation popup asking if you are sure.
-
Click
 to confirm.