This is a new topic in 12.03.
This is a new topic in 12.04.
Content highlighted in yellow is new in 12.03.
Content highlighted in blue is new in 12.04.
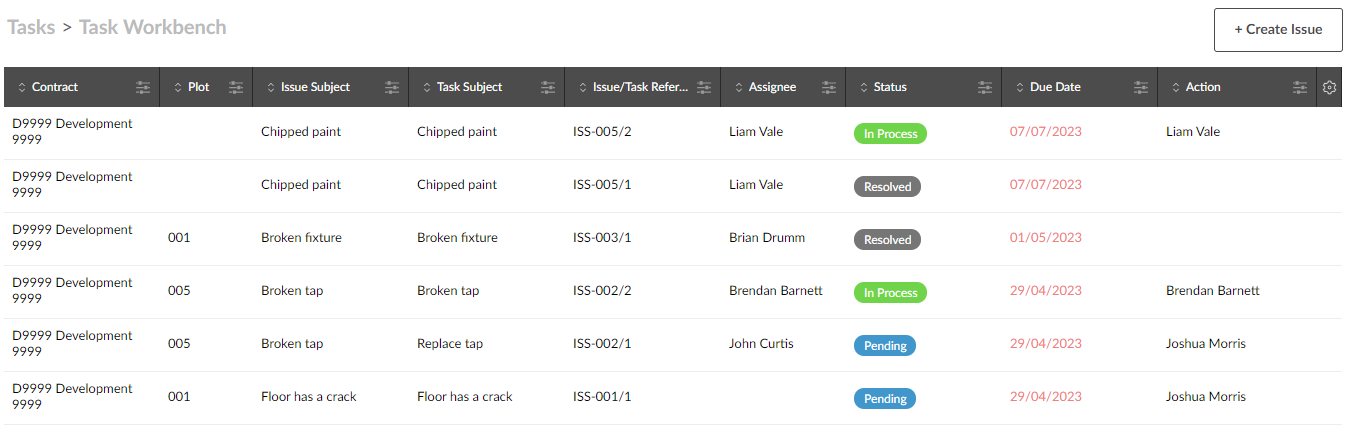
Task Workbench
The Task Workbench contains a grid listing every task assigned to an issue linked to the contract(s) you have selected in the company and contract picker at the top of the screen. On this screen, you can view, edit and process tasks.
Creating a Task
Tasks must be linked to an issue and can therefore only be created from within the Create/Edit Issue window.
To begin adding a task to an issue you are creating, scroll down to the Tasks section of the Create Issue window (the fields for “Issue Task #1” will already be visible by default).
To begin adding a task to an existing issue:
-
Open the issue in Edit mode.
-
Scroll down to the Tasks section of the Edit Issue window and click the Add Task button in the bottom-left to open the fields for a new task.
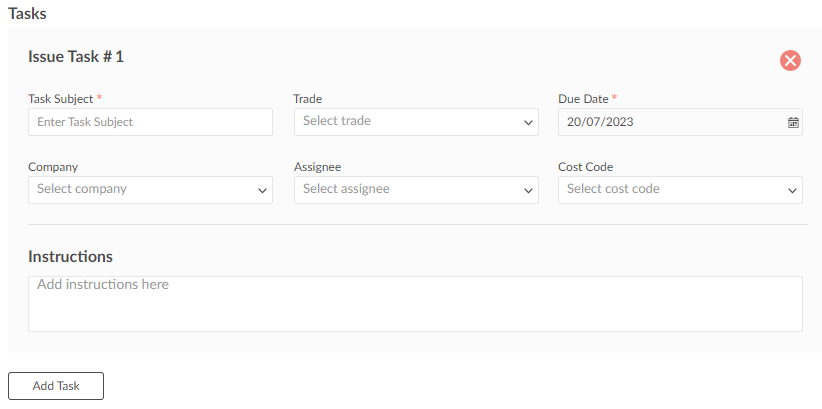
Complete the fields as follows. The mandatory fields are marked with a red asterisk.
|
Task Subject |
Enter a short description of the task. |
|
Trade |
Select the trade of the person who will be assigned to this task. |
|
Due Date |
Enter the due date for the completion of the task. |
|
Company |
Select the company of the person who will be assigned to this task. |
|
Assignee |
Select a person to assign to the task. |
|
Cost Code |
Select a cost code to link to this task. |
|
Instructions |
Enter instructions for how to complete the task if necessary. |
If you are adding the task to an issue you are creating, the task will be saved when you click  . If you are adding the task to an existing issue, click
  to save the task.
Viewing a Task
To view a task, right-click the task on the Task Workbench, or left-click the task and click the menu icon  , then click View. This opens the task in a read-only window.
Editing a Task
Tasks can be edited up until they are resolved.
-
If you are already viewing a task, to begin editing the task click the Edit Task button in the bottom-left of the window. To begin editing a task from the Task Workbench, right-click the task you wish to edit, or left-click the task and click the menu icon
, then click Edit. -
Edit the fields as necessary.
-
Click
 to save your changes.
Processing a Task
Issue Owner:
When work is ready to commence on a task, it must be released. To release a task, open it in View mode, then click  . The task status will update to “In Process” and the assignee will receive an email notification. If the issue it is linked to was in “Draft” status, it will automatically be updated to “Open” when you release the task.
To send a reminder email to the task assignee after you have released the task, open the task in View mode then click  . Alternatively, right-click the task in the Task Workbench, or left-click the task and click the menu icon , then click Send Reminder.
To recall a task after you have released it, open it in View mode, then click  . The task status will revert to “Pending” and the assignee will receive an email notification.
Task Assignee:
Before you send a task review, you may wish or need to add a task resolution and add an attachment to the task. You can do this by tapping the Edit button on the task and scrolling down to the bottom two fields. One or both fields may be mandatory depending on your contract configuration.
To add a resolution, open the task in Edit mode and fill the Task Resolution field. To add an attachment, drag and drop the image or file from File Explorer onto the Edit Task window. Alternatively, click browse from your computer to open File Explorer and select the image or file you wish to attach. You can add multiple attachments if you wish. The file names will appear on the right side of the window. To remove an attachment, click the red X next to the file name. Remember to click to save your changes.
Once you have completed work on the task, you must send it for review. To send the task for review, open it in View mode, then click  . The task status will update to “Ready for Review”.
Issue Owner:
Once a task has been sent for review, you can either send it back for rework if you believe it has not been properly completed or resolve the task. To do this, open the task in View mode, then click either  or
or  .
.
If you send the task for rework, the task status will update to “Rework” and the assignee will receive an email notification.
If you resolve the task, the task status will update to “Resolved”. If there are no other pending or in process tasks linked to the issue, you will be asked whether you would also like to close the related issue.
To reopen a previously resolved task, open it in View mode, then click  . The task status will revert to “Pending” and if the issue it is linked to was closed, the issue status will revert to “Open”.