This is a new topic in 12.03.
This is a new topic in 12.04.
Content highlighted in yellow is new in 12.03.
Content highlighted in blue is new in 12.04.
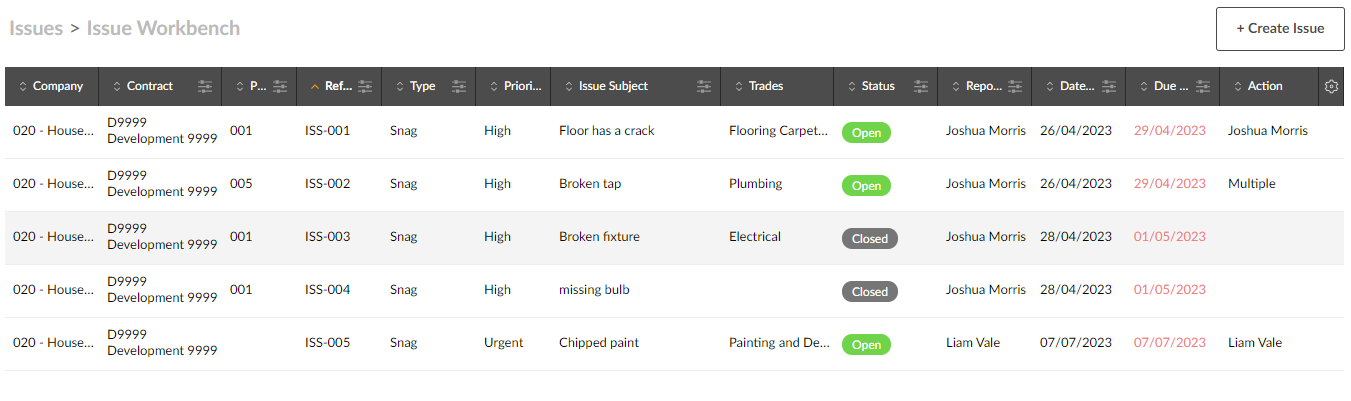
Issue Workbench
The Issue Workbench contains a grid listing every issue linked to the contract(s) you have selected in the company and contract picker at the top of the screen. This includes issues created in the Issue Management mobile app and web module, as well as from the Checklists app. On this screen, you can create, view, edit and process issues.
Creating an Issue
-
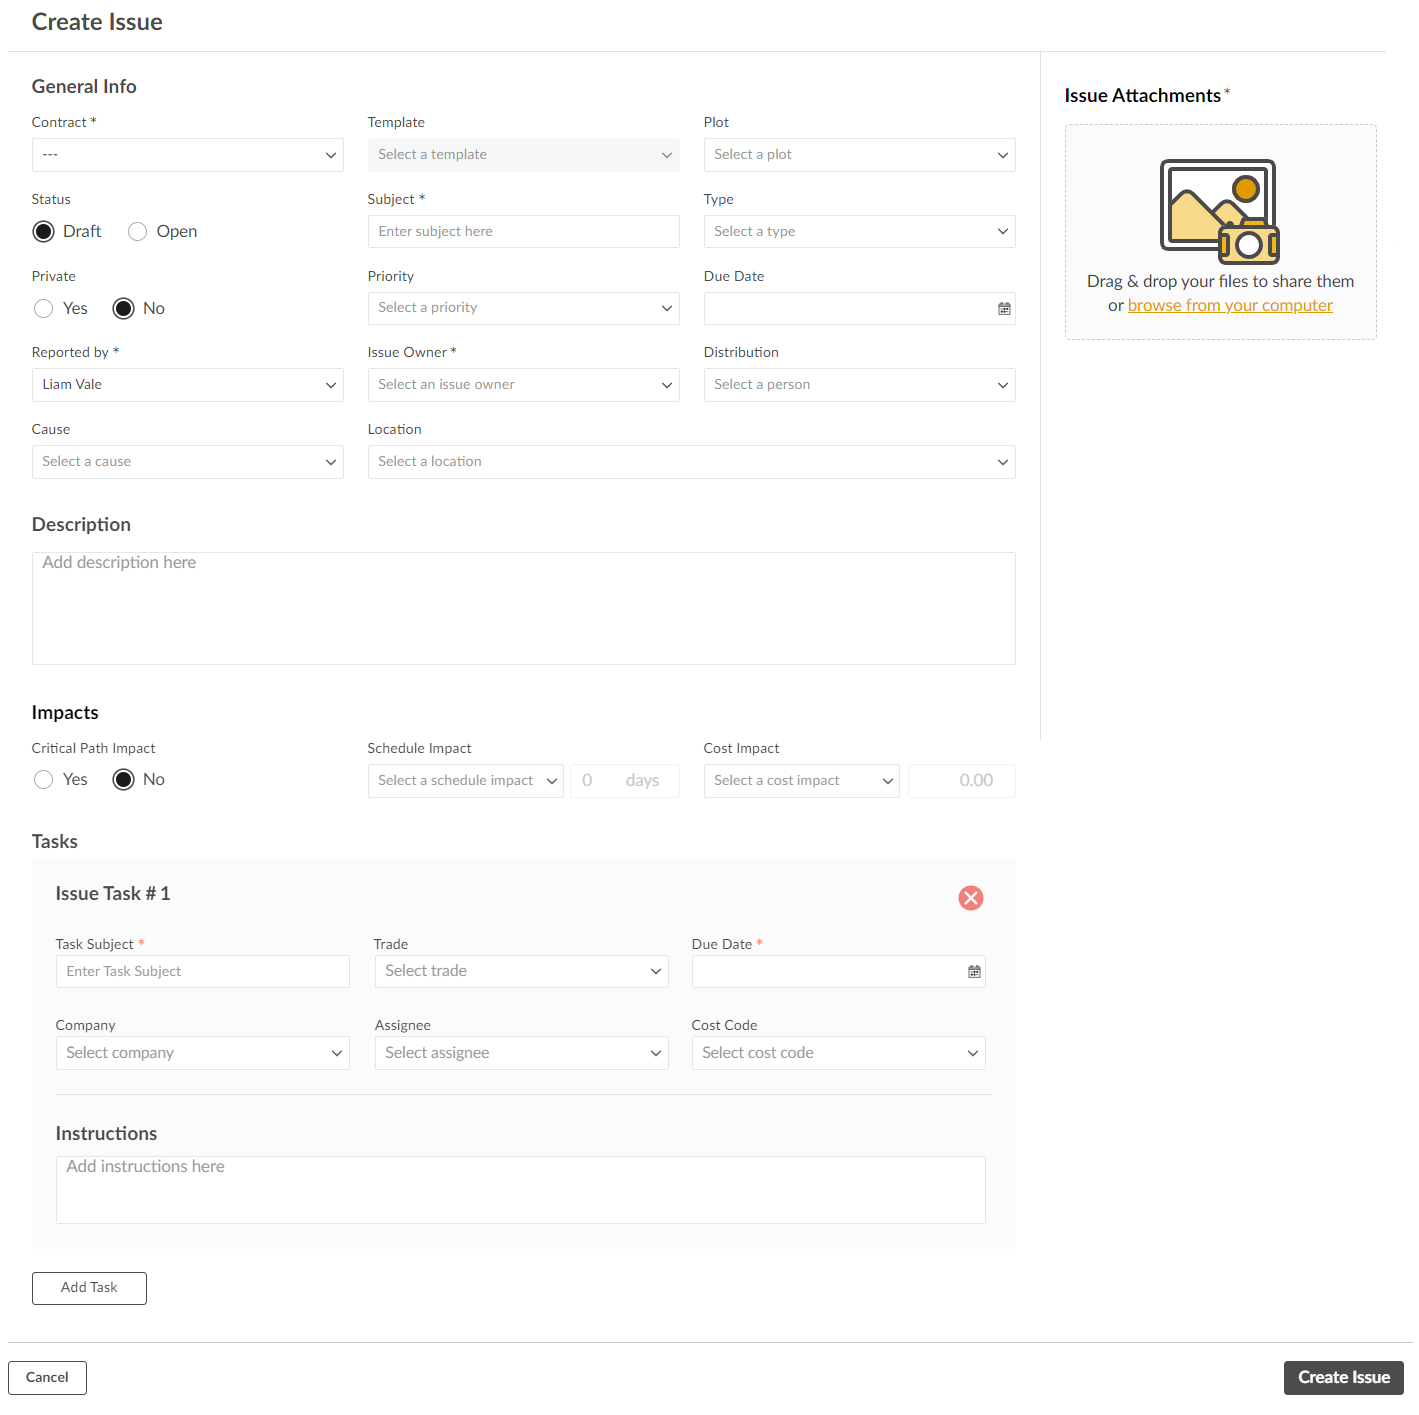
Click the + Create Issue button to open the Create Issue window.
-
Complete the General Info fields as follows. The mandatory fields are marked with an asterisk.
|
Contract |
Select the contract which is affected by this issue. Note that only the contracts you have selected in the company and contract picker are available to choose from in this field. |
| Template | If issue templates exist for this contract, you can select one if you wish. Selecting an issue template will automatically fill most other fields in the General Info and Impacts sections with the values from the template. |
|
Plot/WBS Code |
Select the plot in which the issue was found or the relevant WBS code. The label for this field changes dynamically based on whether the selected contract is a house building contract. |
|
Status |
Select Open to make this an active issue as soon as it is saved or select Draft if you wish to save this as a draft initially. |
|
Subject |
Enter a short description of the issue. |
|
Type |
Select which issue type best describes the issue. |
|
Private |
Click Yes if you wish to mark this issue as private. Private issues are visible only to the issue owner, the reporter of the issue and anyone assigned to a task linked to the issue. |
|
Priority |
Select a priority to indicate how urgent the resolution of the issue is. |
|
Due Date |
Enter the due date for the resolution of the issue. |
|
Reported by |
This is the person reporting the issue. It is auto filled with your name, but if you are reporting the issue on behalf of someone else you can select them from the list. |
|
Issue Owner |
Select which user will be the issue owner. This is the person who will be responsible for reviewing tasks related to the issue and eventually closing the issue. |
|
Distribution |
Select which distribution lists, if any, you would like to attach to this issue. If you attach a distribution list, everyone on that list will receive email updates whenever the status of the issue changes. |
|
Cause |
Select the cause of the issue from the list. |
| Location | Select the location in which the issue has occurred. |
|
Description |
Enter a more detailed description of the issue if necessary. |
-
Complete the Impacts fields as follows. The mandatory fields are marked with an asterisk.
|
Critical Path Impact |
Click Yes to mark this issue as Critical Path Impact if the issue will prevent further work being done on the plot until it is resolved. |
|
Schedule Impact |
Select the most applicable option from the drop-down list, then enter the number of days (if any) by which this issue will delay the overall build schedule. |
|
Cost Impact |
Select the most applicable option from the drop-down list, then enter the cost of fixing the issue (if any). |
-
For information concerning the Tasks fields, see Creating a Task under the Task Workbench topic.
-
To add an attachment to the issue, drag and drop the image or file from File Explorer onto the Create Issue window. Alternatively, click browse from your computer to open File Explorer and select the image or file you wish to attach. You can add multiple attachments if you wish. The file names will appear on the right side of the window. To remove an attachment, click the red X next to the file name.
-
Click
 to save the issue.
Viewing an Issue
To view an issue, right-click the issue on the Issue Workbench, or left-click the issue and click the menu icon  , then click View. This opens the issue in a read-only window.
Editing an Issue
Issues can be edited if they are still open or in draft.
-
If you are already viewing an issue, to begin editing the issue click the Edit Issue button in the bottom-left of the window. To begin editing an issue from the Issue Workbench, right-click the issue you wish to edit, or left-click the issue and click the menu icon
, then click Edit. -
Edit the fields as necessary. Other than the contract, all fields are editable. You can also add and remove attachments.
-
Click
 to save your changes.
Processing an Issue
To close an issue, open it in View mode, then tap  . Any “Pending” tasks linked to the issue will automatically be marked as “Resolved” when you close the issue. Note that if the issue has any linked tasks with the status “In Process”, the button will be greyed-out and the issue cannot be closed until the tasks are resolved.
To reopen a closed issue, open it in View mode, then tap  .
.