This is a new topic in 12.03.
This is a new topic in 12.04.
Content highlighted in yellow is new in 12.03.
Content highlighted in blue is new in 12.04.
Adding Sections and Items Manually
Adding a Section
-
Find the template you wish to add a section to and click its name. Alternatively, right-click the template, or left-click the template and click the menu icon
 , then click View Sections and Items.
 -
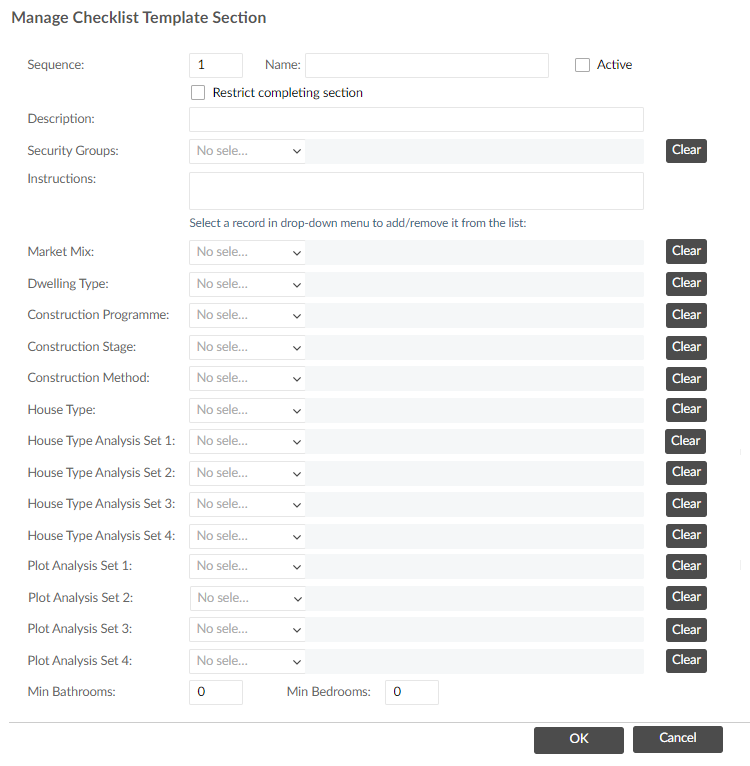
Right-click on the table and click Add Section. This opens the Manage Checklist Template Section window.
-
Enter a number in the Sequence field. This number indicates the position this section will take in the checklist. For example, with sequence number 3, the section will be the third one down on the list.
-
Enter a name for the section in the Name field.
-
If you wish to use this section, tick the Active tick box. If left unticked, this section will not be added to any checklists even if the template is set to Current.
-
Tick the "Restrict completing section" tick box if you wish to disable the "Complete" button for this section on the mobile app. This will prevent mobile users from being able to complete the section in one click - they must instead complete each individual item.
-
Enter a description of the section in the Description field.
-
If you wish, select which security groups will have access to this section using the Security Groups drop-down. Users not belonging to at least one of the selected security groups will not be able to see this section. If you leave the field blank, all users will have access to the section.
-
If necessary, you can enter instructions for completing this section in the Instructions field. Mobile users will be able to see these instructions when they open the section.
-
Select entries from the drop-down menus for each of the categories on the left-hand side of the window. These are the types of plots the section (and associated items) will show for. If the lists are large, you can use the search bar at the top of each drop-down to find the desired entries. The entries will appear in the fields to the right as you select them. You can select multiple entries per row; to remove an entry, select it again from the drop-down menu. The Clear button removes all entries from a row. For master templates, only the options which exist for all linked companies are available to select.
-
If applicable, enter the minimum number of bathrooms and bedrooms at the bottom of the window.
-
Click
 to save the section.
Adding an Item
-
Find the template you wish to add a section to and click its name. Alternatively, right-click the template, or left-click the template and click the menu icon
, then click View Sections and Items. -
Click the Items tab.
-
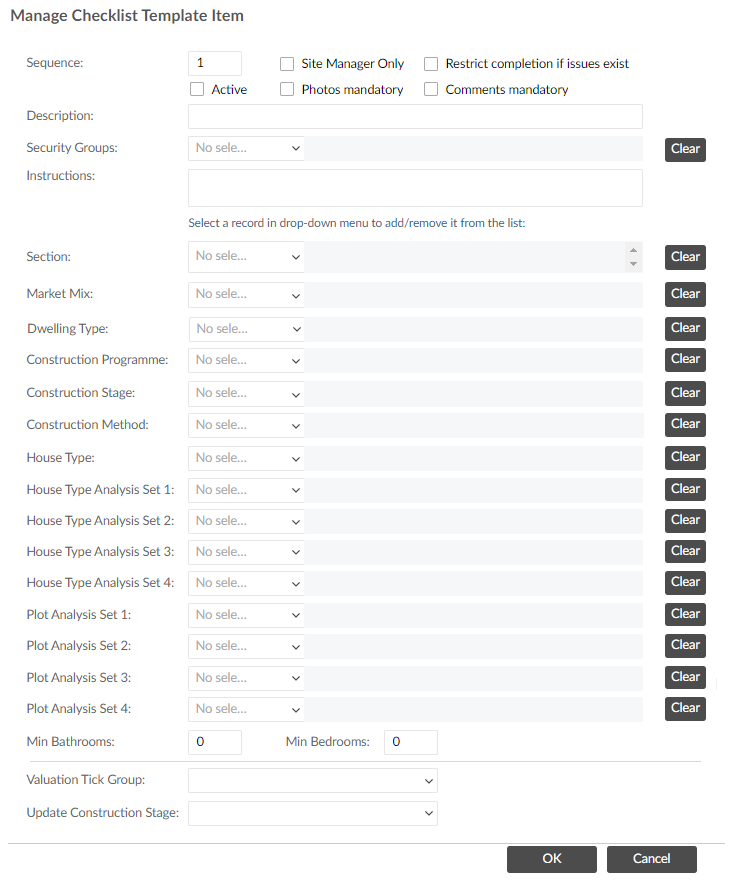
Right-click the table and click Add Item. This open the Manage Checklist Template Item window.
-
Enter a number in the Sequence field. This number indicates the position this item will take in the section. For example, with sequence number 3, the item will be the third one down on the list.
-
Configure the tick boxes as follows:
-
Enter a description of the item in the Description field.
-
If you wish, select which security groups will have access to this item using the Security Groups drop-down. Users not belonging to at least one of the selected security groups will not be able to see this item. If you leave the field blank, all users will have access to the item.
-
If necessary, you can enter instructions for completing this item in the Instructions field. Mobile users will be able to see these instructions when they open the item.
-
Select entries from the drop-down menus for each of the categories on the left-hand side of the window. These are the types of plots the item will show for. The entries will appear in the fields to the right as you select them. You can select multiple entries per row; to remove an entry, select it again from the drop-down menu. The Clear button removes all entries from a row.
-
If applicable, enter the minimum number of bathrooms and bedrooms.
-
Select a valuation tick group and a construction stage from the drop-down menus at the bottom of the window. These are linked to the progress tracking of plots in COINS ERP+.
-
Click
to save the item.
| Site Manager Only | Tick this box to restrict completion of this item to users with the Site Manager role. Leave it unticked to enable any user with access to the checklist to complete the item. |
| Restrict completion if issues exist | Tick this box to restrict completion of this item in the event that there are open issues linked to it. |
| Active | Tick this box if you wish to use this item. If left unticked, this item will not be added to any checklists even if the template is set to Current. |
| Photos mandatory | Tick this box to make it mandatory for mobile users to add at least one photo to this item before they can complete it. |
| Comments mandatory | Tick this box to make it mandatory for mobile users to add a comment to this item before they can complete it. |