This is a new topic in 12.03.
This is a new topic in 12.04.
Content highlighted in yellow is new in 12.03.
Content highlighted in blue is new in 12.04.
-
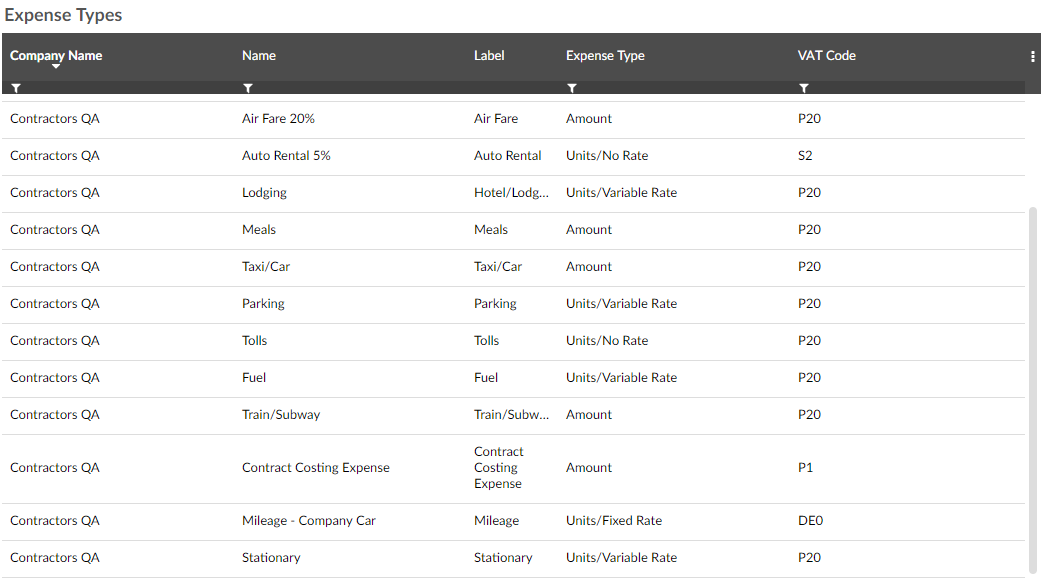
Click Expense Types. This shows a list of all expense types already available for employees to select from in your expense system.
-
Right-click a row in the list, or left-click a row and click the menu icon
 , then click Add New. This opens the Add New Expense Type window.
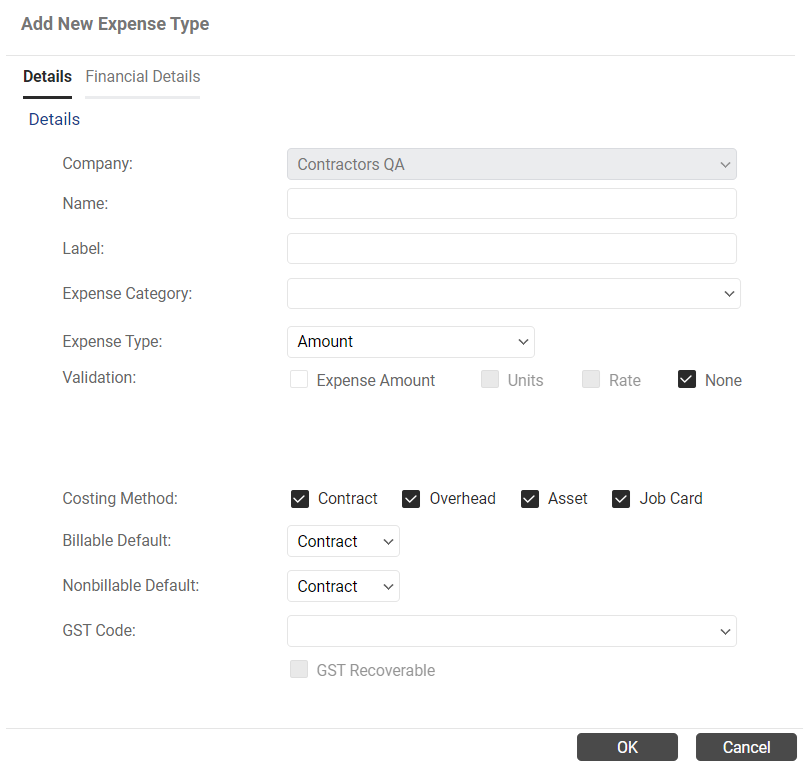
-
Fill in the information as follows:
-
Amount: User enters the value of the claim.
-
Units/Fixed Rate: User enters a number of units and the value of the claim is then calculated using the fixed rate specified in the corresponding expense type policy.
-
Units/No Rate: User enters a number of units and the value of the claim.
-
Units/Variable Rate: User enters a number of units and the rate at which the units were charged and the value of the claim is then calculated accordingly.
-
Vehicle-Based: User enters their mileage and the value of the claim is calculated based on the relevant distance rate. If you select this type, the Vehicle Classifications tab becomes available (see below section). Note that vehicle-based expense types are not visible to claimants; the claimant selects "Mileage/Vehicle-based" from the Expense Type list and the specific expense type is determined by their vehicle selection.
|
Company |
The company in which this expense type will be used (expense types are specific to a single company). |
|
Name |
The name of the expense type. |
|
Label |
The label that is applied to the amount field. |
|
Expense Category |
Expense types can be grouped together into categories. For example, expense types “Bus”, “Train” and “Taxi” could be grouped together under a “Travel” category. To put the expense type into a category, select from the drop-down list. These categories can be configured in Expense Type Categories (see Expense Type Categories). |
|
Expense Type |
This determines the information the claimant must provide in the Cost Details section of the claim item. |
|
Validation |
This determines whether you will be able to set a maximum claim amount, maximum number of units, maximum rate or any combination of the three in the corresponding expense type policy. Validation is disabled for vehicle-based expense types. |
| Label Used for Units | This field appears only if you selected Units/Fixed Rate, Units/No Rate or Units/Variable Rate as the expense type. Enter the name of the units the claimant will be entering for this expense type, for example "nights" or "litres". |
| Show Odometer controls and map link | This tick box only appears if you selected Units/Fixed Rate, Units/Variable Rate or Vehicle-Based (in which case it cannot be disabled). This functionality is useful specifically for mileage-related expense types. If you tick this box, claimants will be able to enter the start and end readings from their odometer to automatically calculate the distance travelled. Alternatively, they can follow a link to Google maps to plot their journey and find out the distance travelled. |
| Default to previously used rate | This tick box only appears if you selected Units/Variable Rate. If you tick this box, then whenever a claimant selects this expense type, the Rate field will be auto-filled with the value they used the last time they saved an expense item of this type. They can still edit the rate if they wish. |
| Costing Method | Tick or untick the boxes to enable or disable the use of each costing method when claimants are creating an expense item of this type. Note that the Contract, Asset and Job Card costing methods will only be visible here if their respective parameters are enabled in Expense Parameters. Furthermore, even if a costing method is enabled both in the parameters and for the expense type, the claimant must also have it enabled in their user settings (see Expenses Users) to be able to use it. |
|
Billable/Nonbillable Default |
The Billable Default is the costing method that will be selected by default when the claimant has ticked the "Billable to Client" box while creating an expense item of this type; the Nonbillable Default will be selected by default when the box is not ticked. The selection in these drop-downs is limited to the costing methods you have enabled for this expense type. |
|
VAT Code |
The VAT code that applies to the expense type. |
|
VAT Recoverable |
Tick this box if your company will be able to reclaim the VAT amount in the expense. |
-
To save the expense type, click
 . Note that the expense type will not be usable by employees entering expense claim items until you create at least one corresponding expense type policy.
Vehicle Classifications
If you select Vehicle-Based from the Expense Type drop-down, the Vehicle Classifications tab becomes available. Open this tab to configure which classifications of vehicle will be able to be assigned to this expense type. See Vehicle Classifications for details on how to create vehicle classifications.
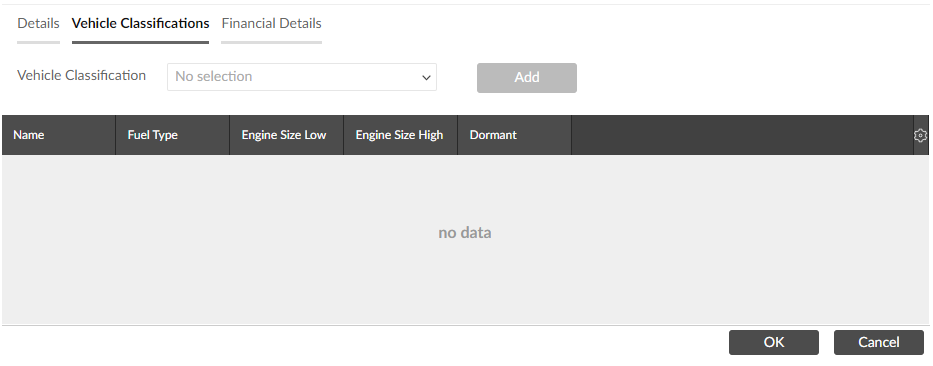
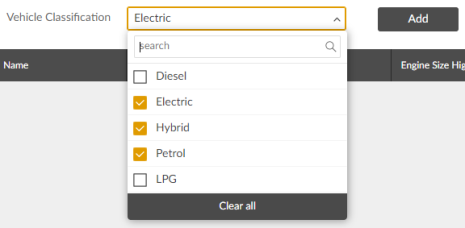
To add a classification to the expense type, select it from the Vehicle Classification drop-down then click  . You can add multiple classifications at once this way if you wish.
To remove a classification, click the delete button on that row of the grid. If the classification is already in use for this expense type, it cannot be deleted. Instead, it can be made dormant. This will prevent it from being used in future claim items, but existing claims will be unaffected. To make a classification dormant, click the right-hand circle in the right-most column of the grid to turn it red. A tick will appear in the Dormant column to indicate that the classification is now dormant.

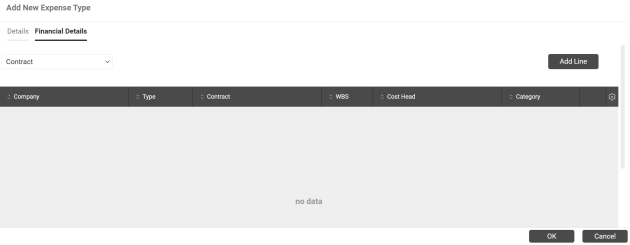
Financial Details
You can set default financial details for an expense type from the Manage Expense Type window. Financial details can be set at global, company and contract level. These details will be pre-filled when a claimant selects this expense type while creating a claim.
-
To begin setting default financial details for an expense type, open the Financial Details tab on the Manage Expense Type window.
-
Select the costing method for which you wish to set the defaults from the drop-down menu above the grid.
-
To add new details, either click
 or right-click the grid and select Add Line. A new line will appear in the grid with in-line editing enabled.
 -
Select the company these details are for from the Company drop-down list. It is possible to set up to two sets of company-level default details per company.
To set global default details for all companies, leave the Company field blank. These global details will be used for all companies which do not have company-specific financial details set.
-
Select whether these details are for billable or non-billable expenses using the Type drop-down.
-
If you wish to enter default details for a contract, select a contract from the Contract drop-down. If you leave the Contract field blank, then the details you enter in the next step will become default details for the company you selected. When a claimant is entering a claim, the company default details will be pre-filled first. If the claimant selects a contract, the default details for that contract will then be filled automatically, if they exist.
-
Enter the financial details in the final three fields.
-
Click
to save. The details you entered will appear as a line in the grid on the Financial Details tab.
If you wish to edit default financial details, every field can be edited from the grid in the Financial Details tab using in-line editing.
To delete default financial details, click the delete buttonon the row you wish to delete.