This is a new topic in 12.03.
This is a new topic in 12.04.
Content highlighted in yellow is new in 12.03.
Content highlighted in blue is new in 12.04.
-
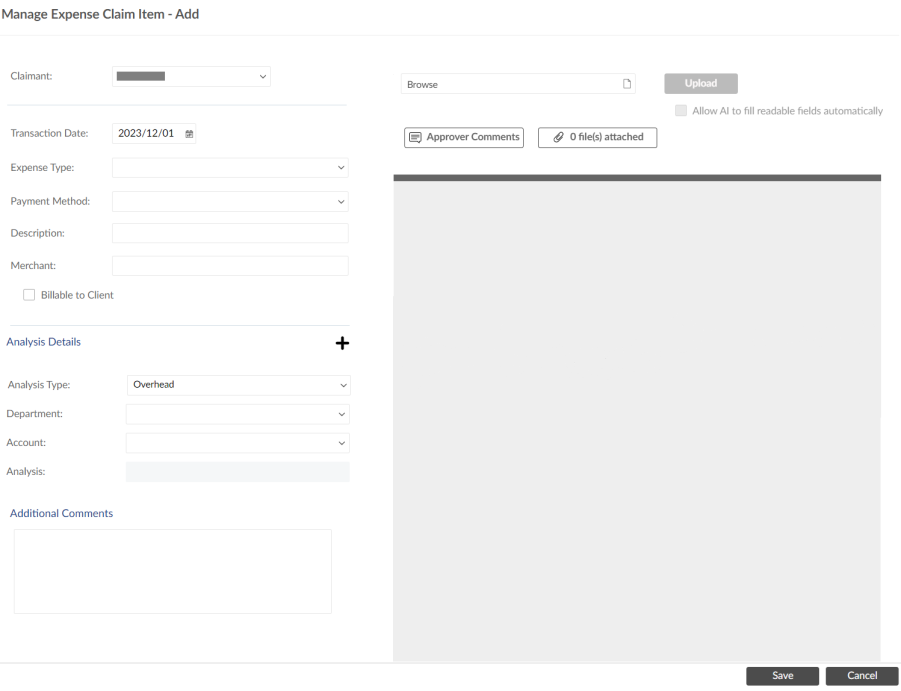
Click Create New Expense Claim Item. This opens the Manage Expense Claim Item - Add window.
- If Optical Character Recognition (OCR) has been enabled by your company and you are recording a non-mileage-based claim, you should first upload an image of your receipt, as some of the fields will be auto-filled based on the scan of the image. You can tell whether OCR is enabled by the presence of the 'Allow AI to fill readable fields automatically' tick box. If OCR is disabled, the tick box will not be visible. For more information, see Adding and Removing Attachments.

Note that using OCR is not recommended for mileage-based expense claims, as it can result in incorrect VAT being recorded.
-
Enter the details in the first section.
| Claimant | This field is only visible if you have been configured to act on behalf of another claimant. Your own name will always be selected by default, but you can select another claimant from the drop-down list to record an expense in their name if necessary. |
|
Transaction Date |
The date you incurred the expense. You can click the calendar icon and select the date, type the date manually, or use standard Coins shorthand, for example $-1w-2d to mean “one week and two days before today”. Your company may have a policy which restricts how far in the past you can enter claims. |
|
Expense type |
The type of expense. You select this from a pre-set list determined by your company’s policies. If you select Mileage/Vehicle-based, see Google Maps Functionality for detailed instructions. |
| Vehicle | This field appears if you selected the Mileage/Vehcile-based expense type. Select the vehicle you are recording mileage for from the drop-down list. If the relevant vehicle is not in the list, click |
|
Payment Method |
The method you used to pay for the expense. |
|
Description |
A description of the expense. |
|
Merchant |
The person with whom or the business with which you incurred the expense. |
|
Billable to Client |
In some cases, you may incur an expense of behalf of a client. If this is the case, tick the Billable to Client box. |
-
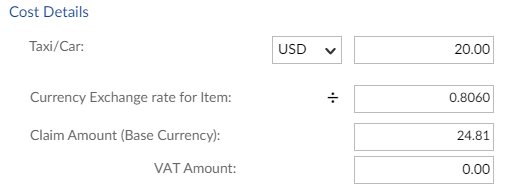
Enter the Cost Details. This includes the amount you are claiming for and possibly some additional information depending on the Expense Type. If you have multi-currency enabled on your account, you will be able to select from a drop-down list of currencies supported by your company.

The value you enter next to the currency should match the amount on the receipt. If your company has exchange rates loaded for this currency, the exchange rate will appear and the base currency amount will be calculated automatically.

Both the exchange rate and the base currency amount can be edited. This allows you to match any reimbursable amount to a bank or credit card statement.
-
If available, enter the Analysis Details. If default financial details have been set for your company for your chosen expense type, they will be pre-filled for you.
If your company expense parameters allow for it, you can split the claim across multiple analysis details if necessary. To do this, click the + button at the top of the Analysis Details section to open an additional set of analysis fields. They will be labelled "Costing 1", "Costing 2" and so on. You can split the claim up to three times this way.
Note that under your company expense parameters, Analysis Details may be set to View Only for claimants, in which case you will not be able to edit them. Analysis Details can also be set to Hidden for claimants, in which case you will not be able to see them.
-
Certain Expense Types may require further information in addition to what you entered in the default fields. If you have selected such an Expense Type, complete the new fields that have appeared near the bottom of the window under the heading Document Further Details on this Claim Item.
-
If there is some additional information that your employer should know regarding the expense item, you can include it in the Additional Comments box.
-
To save the expense claim item, click
 . The item will now be stored, ready to be added to an expense report.