This is a new topic in 12.03.
This is a new topic in 12.04.
Content highlighted in yellow is new in 12.03.
Content highlighted in blue is new in 12.04.
Managing Users
The Users screen contains the list of CCC users that have been created and had their account request accepted. From here, you can modify the details and user groups of a user, deactivate or reactivate a user, reset a user’s password and resend the activation email to a new user.
/2Managing Users.png)
Modifying a User
The username and Super Admin status of each user can be modified at any time. Users will be sent an automated email informing them of any change to their username.
For standalone users, the email, first name and last name can also be modified once their account has been activated. All other details are specified during user creation and cannot be modified.
For users linked to COINS ERP+, the email, first name, last name and title can be changed only from within COINS ERP+. See this help topic for more details (client login required).
- Right-click the user whom you wish to modify, or left-click the user and click the menu icon
/Menu icon.png) , then click Modify. This opens the Manage User window for that user.
, then click Modify. This opens the Manage User window for that user.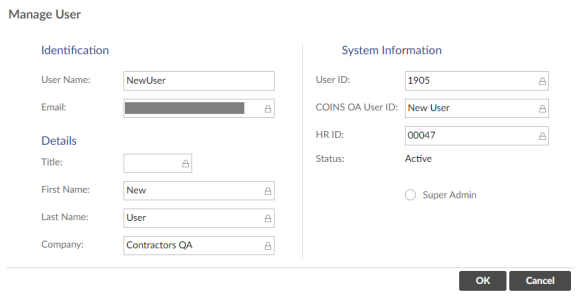
- Edit the available fields as necessary.
- To enable or disable Super Admin status, tick or untick the Super Admin tick box. This status gives the user access to the Administration module. Note that a user cannot edit this box for themself.
- Click
/OK Button.png) to save your changes.
to save your changes.
Deactivating and Reactivating Users
Users can be deactivated and reactivated at any time, even before they have activated their account via email. Deactivated users will not be able to log in to CCC until they are reactivated. Activation status is displayed in the Active column of the Users grid. Deactivated users have a cross /Cross.png) and activated users have a tick
and activated users have a tick /Tick.png) . Users who have not yet activated their account via email have an email icon
. Users who have not yet activated their account via email have an email icon /Email.png) .
.
To deactivate a user:
- Right-click the user you wish to deactivate, or left-click the user and click the menu icon , then click Deactivate. You will receive a popup warning asking if you are sure.
/2Managing Users_7_499x118.png)
- Click to confirm.
To reactivate a user:
- Right-click the user you wish to reactivate, or left-click the user and click the menu icon , then click Activate. You will receive a popup warning asking if you are sure.
/2Managing Users_8.png)
- Click to confirm.
Resetting a User’s Password
To reset a user’s password:
- Right-click the user for whom you wish to reset the password, or left-click the user and click the menu icon , then click Reset Password. This opens the Override Password window.
/2Managing Users_11.png)
-
Enter the new password for the user in the New Password field. It must fulfil all of the listed requirements.
-
Click
/Save button.png) to save the new password.
to save the new password.
Re-sending the Activation Email
Users who have not yet activated their account via email have an email icon in the active column. It may be necessary to resend the activation email to a user if they cannot find the original email, or if the link in the original email has expired.
- Right-click the user to whom you wish to resend the email, or left-click the user and click the menu icon , then click Re-send Activation Email. You will receive a popup message asking if you are sure.
/2Managing Users_10.png)
- Click to confirm.
Modifying User Groups for a User
The user groups assigned to a user determine which apps, and which user roles within those apps, the user has access to.
The method described below can be used for modifying the user groups for a single user. If you wish to add multiple users to multiple user groups, there are two ways to do this which are quicker than updating each user one at a time: you can bulk update user groups via CSV (see Bulk User Group Update) or manually select a set of user groups and then select a list of users to assign to them on the User Groups screen (see User Groups).
To begin modifying user groups for a user, first right-click the user, or left-click the user and click the menu icon , then click Modify User Groups. This opens the Modify User Groups for screen.
/2Managing Users_3.png)
To add a user group:
- Select the user group from the drop-down menu.
- Click
/Add button.png) . The user group will then appear in the list below.
. The user group will then appear in the list below.
To remove a user group:
- Right-click the user group you wish to remove, or left-click the group and click the menu icon , then click Remove From Group. You will receive a popup message asking if you are sure.
/2Managing Users_5.png)
- Click
/Delete button.png) to confirm.
to confirm.